Keyframes and Guides
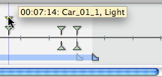
Keyframes and GuidesA keyframe indicates a particular event at a T instant in the scene. Keyframes are linked to the following animated elements: camera, light, heliodon, object, animated textures.
(Camera, light; heliodon, object, animated texture)
Camera: position, rotation, focal, etc.
Light: position, state, type, power, color, etc.
Heliodon: date, time, etc.
Object: position, rotation, scale, etc.
Animated texture: plays the avi or mov sequence.
Animation will be interpreted between two keys.
|
|
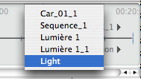
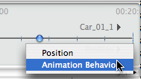
![]() NB: In order to choose the parameter for an animated element, you must first select the element and then select the parameter.
NB: In order to choose the parameter for an animated element, you must first select the element and then select the parameter.
3 options:
![]() NB: When an element is no longer animated, turning on record mode will create 2 key images. The one located at the start of the sequence assumes the parameter value before the modification. The second one located in current time assumes the post-modification parameter value.
NB: When an element is no longer animated, turning on record mode will create 2 key images. The one located at the start of the sequence assumes the parameter value before the modification. The second one located in current time assumes the post-modification parameter value.
If the parameter of an element already has keyframes, the record mode creates a single keyframe. This keyframe is located in the current time and has the post-modification parameter value.
![]() NB: Turning on record mode in the Timeline window forces the 2D View to appear when editing keyframes.
NB: Turning on record mode in the Timeline window forces the 2D View to appear when editing keyframes.
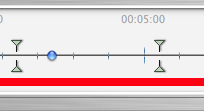
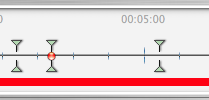
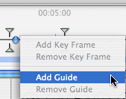
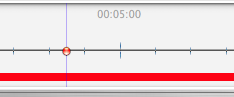
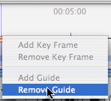
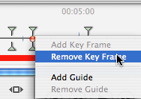
Right click on the cursor (blue or red bullet icon).
|
|
|
|---|---|---|
|
|
|
|
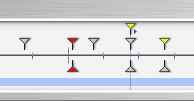
These serve as visual Timeline tags ![]() (blue vertical line).
(blue vertical line).
Enables the use to synchronize more than one animated element (e.g.: moving a camera must match the same T instant as opening a door) or to synchronize animated settings tied to the same element.
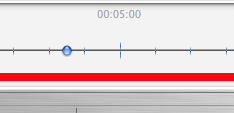
![]() NB: Moving the cursor on the slide bar near a blue guide magnetizes the cursor. This makes it easier to synchronize parameters among several animated elements.
NB: Moving the cursor on the slide bar near a blue guide magnetizes the cursor. This makes it easier to synchronize parameters among several animated elements.
|
|
|
|---|---|---|
|
|
|
|
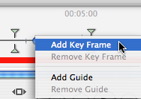
- Right click on the cursor and choose the Delete Guide item.
|
Artlantis User Guide : Keyframes and Guides |
© 2008 Abvent www.artlantis.com |